Blog background

Tuesday, October 24, 2017

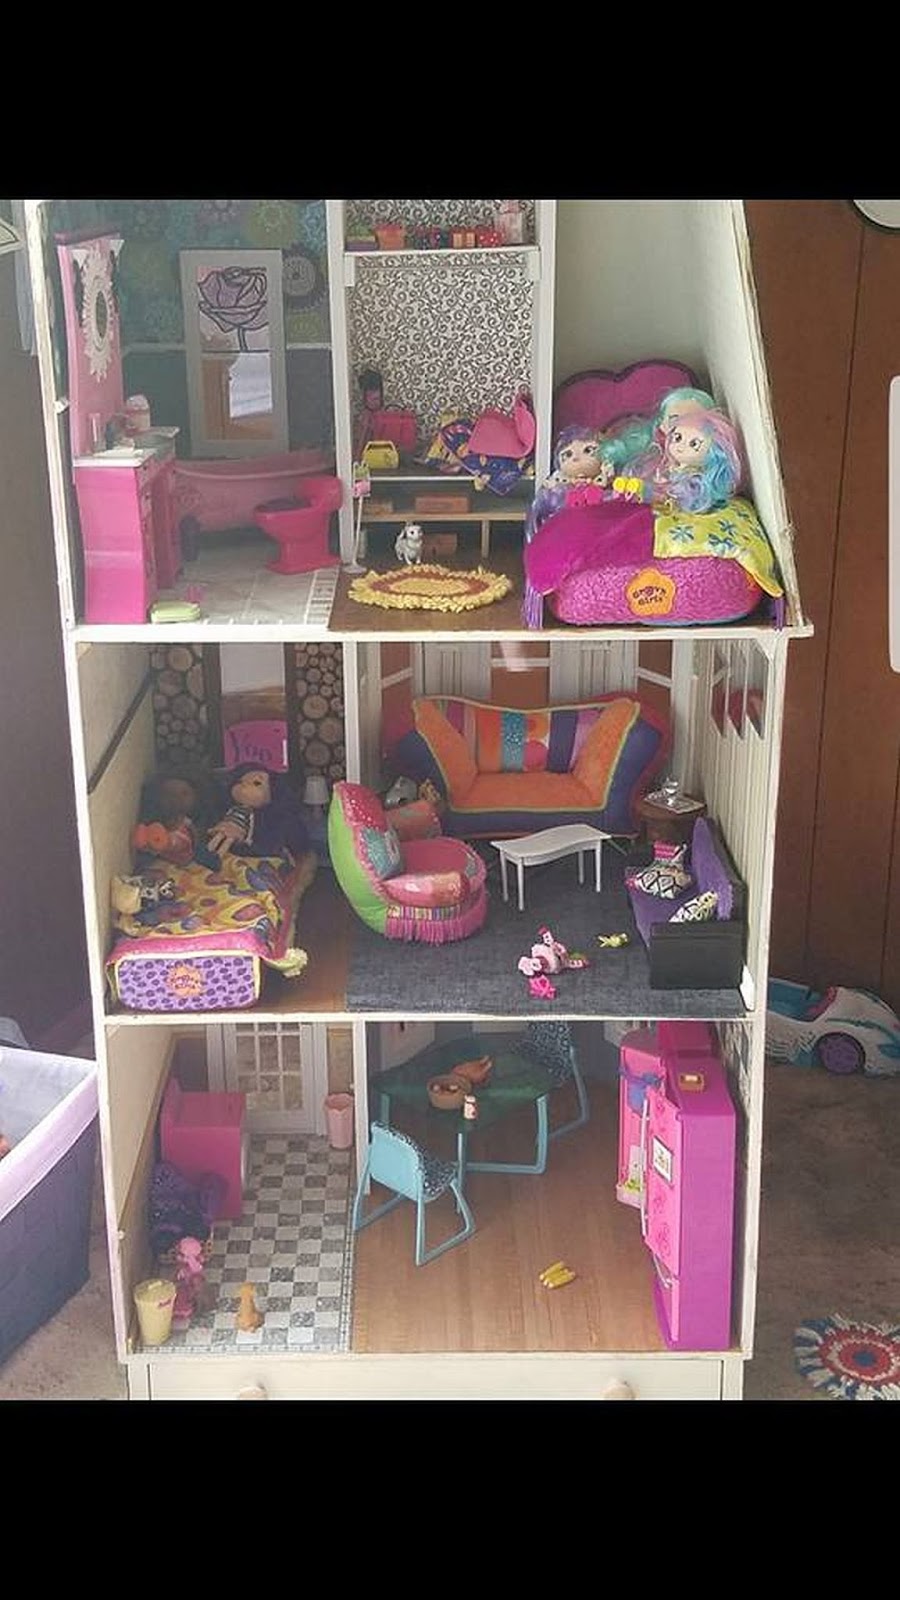
Pink Barbie House Rehab: Done!

This was the feature wall of the
bedroom upstairs.


Yuppers, that's right -- and it was actually done a few months back, but I allowed myself to focus on a couple more rehab houses... oops.

None the less, I wanted to make sure I updated with the final pictures of the dollhouse all done. I've been told since the family that was getting it for their little girl got it home that it has been the envy of not just her friends, but that mom and her adult friends would love it if their real homes were that nice! Soo, I'm taking that to mean they're all happy with it.  😌 Which for me means a lot, b/c I know if I would have had more time, I would've done more with it.

The rest of this is just going to be pictures of the house, if you care to make them bigger just click on them.

*My apologies but Blogger is still not working well with me when I try to put pictures in specific spots in my posts -- if anyone has tips I would LOVE to hear them!

Rom w/cloth wall covering.


Kitchen tiling in progress.
These were 1:12 floor tiles.
Bathroom finished with
stained glass rose window.


Closet with shoe boxes/
storage cubes.

What I would consider a
more modern parlor...


Foyer/entryway. 


How the kitchen/dining area
ended up.


House interior before moving.
Only pic I got of the removable
second floor carpet.


Picture I got from her mom showing the
house set up & furnished.


Wednesday, June 7, 2017

A Rehab Unlike Any I've Done Before


That title sounds pretty dramatic doesn't it?!? It's true though, as I've not really worked in the 1:6 scale before! Must admit, I think it probably would have been easier getting my feet wet in this scale with a new build, as opposed to rehabbing a house that had definitely seen better days... None the less, thought I'd do a quick update as to where I've been and what I've been working on. I only have a few progress pictures for now(still dealing with computer and camera issues) but I have figured out a way to get a few to load at a time.


I've decided for this initial post I'm going to just try to update on one or two rooms, so you're not inundated with lots of pictures. That first picture is very simply a piece of 12" x 12" linoleum I believe that I got in a pack of 10 tiles at a dollar store type of shop. I liked the marble look, and recalled a tip I'd learned way back when of sketching out the lines you want for your grout lines and then using your X-Acto blade to cut along each side of those lines. Once done, you have easy grout lines! This was the first time I'd tried this, and must admit it was a lot easier than I figured it would be. Definitely a trick I'll remember for future use!

I'd like to say the bathroom is completed -- however final trim needs to be installed, as well as main accessory components like the windows and doors to the house, and the floor still needs to be grouted also. Papers were installed, purple to go with the little girls favorite colors. In the above picture I was checking to see if the chair rail trim would work well with that room. You can also see that the bottom paper, a scrapbook paper I got in a lot from Goodwill was still drying. I had to seal it three times to make sure you could get with-in 5 ft. and not have glitter all over! lol None the less, I do like the way it's turning out, and though the purple is a darker color -- the room doesn't seem to be over-powered by it.

My apologies to all, as I'm still having issues getting my pictures to upload and position where I'd like them to -- but at least you all know I'm still alive and mini-ing!


Thursday, July 21, 2016

Been a long time gone...

I have been a long time gone from my blog, and for my followers I am sorry. I am still working on the Georgetown Brownstone dollhouse by Craft Products, but moved back home and dealt with all the hassles that entails. On the bright side with that move home I am revamping my life a bit and repainting my interior space, as well as getting my shop set up to be more conducive to my miniature work. Going from a... we'll say interesting paint job with wallpaper border put up when I was a teen to something a bit more calming, and I hope helpful to working in when I'm done. I will also I hope be taking up some carpet in half of the room, and installing some laminate flooring that looks like wood. This should be a lot easier to find small things on if I happen to drop anything off of the desk in my new work area. If all comes out according to plan I  will be sure to update with pictures.

Now the main reason for this blog is to follow along with my mini-making -- and I will get to the updates on the Brownstone now for all of you! For anybody new, please know that if you click on any picture it will enlarge to more easily see the details.  :) To the upper right you can see the wallpaper and flooring choices in place, the carpet and flooring is not permanently in on the second and third floors as I've yet to finish installing my lights and chandeliers. I love the paper on the third floor, as well as the bedroom, and living rooms -- all are vinyl papers that if they were to get dirty they can be easily wiped down, and they all have a bit of texture to them. A characteristic I truly love as most dollhouse wallpapers are just too smooth(similar to what is used in the upper half of the bathroom on the right of the second floor). The papers used for the kitchen and entry/foyer on the right of the first floor are both scrapbook papers, but I felt they were perfect in that they tie in with my theme of using creams and gold throughout to unify the house.

Funny stories in regards to the first floor -- I had the kitchen flooring completely finished and the same length as the living room flooring and couldn't figure out why it didn't seem right to me... of course this caused me to delay on installing it until I could figure out why it didn't seem right. This had me one evening perusing Pinterest and Googling brownstone style houses -- bang, hit me that most have some sort of foyer or entryway! This led me to cut off several inches of my kitchen floor as well as completely readjust the kitchen ceiling... but I love the addition of the marble for the foyer and the new foyer ceiling, b/c once my thresholds and trim are in between the rooms I truly believe it will make all the difference in making it more realistic!  :) 

 
In addition to the fun of changing/having to re-make the ceiling for the kitchen along with adjusting my flooring  for the kitchen, I also am having some extra fun with the interior door frame. If you were here for my first post about this build -- when I got the kit it didn't have any windows, nor did it come with any added details like a door on the inside of the front panel. After looking all over, I finally got lucky when a friend of mine decided to pare down her own collection and sold this -- which measurement wise and detail wise works perfectly for what I want it to. That is it measures perfectly with the existing door frame on the exterior of the front panel, however I realized the other night when installing wallpaper and seeing how it looked -- that you know what, it's got just enough depth to create an issue for the front panel to close properly. However, if anyone knows me they know I'm stubborn enough to not let a little detail like a .25" depth stop me! Nope, I have intentions of making a mold of this frame first(so if I mess it up I can make another easily enough), and then I'm going to sand the back of this down with the belt sander so it's no longer so thick in depth and will allow the front panel to open and close smoothly... I hope.

Other news the third floor still is in need of wainscot, I decided on board and batten wainscot with a bit of a twist -- which is of course causing me a number additional cuts to the norm, but I think it will be fun and different when done. The proprietress of this home finally has a name -- Ivy, and has told me she likes the general idea of old class with a few twists to update and keep it fun. We shall see if she likes it all when I'm finished, which I truly believe the interior will be with-in the next couple of weeks. The exterior I've pulled out my pack of Paperclay, and am gearing myself up to finally get the gumption to start sculpting bricks to match the sheets of bricks that are already applied to the exterior of the Brownstone. I believe I'm going to attempt that with the clay just rolled out and then sculpt the bricks in to match. However, while I have the clay out I also have another build that I have a stone stencil from Bromley that I'm going to water the clay down until it's a pancake batter consistency and then use that with the stencil. I've read and researched that if you make the watered down clay in a jar that you can seal it keeps for years -- I'm just hoping it really works well with the stencil. Which means I'll hopefully be posting pictures of a stone church here soon enough for you all as well. I'll give you the back story on that once I put it together again and start showing pictures. lol

That's all for now, as it is rather late but I hope everyone is enjoying the summer and enjoying their own builds! Hope to be back again soon with more picture updates of progress!

Sunday, April 10, 2016

Update post...

Living room/parlor floor
Subway tiles in the making.
The Brownstone is still getting my full attention... just that that attention has been a bit spread out. lol I'm going to try and just upload a good number of photos to catch everyone up on what I've been working on. If anyone is on Instagram my tag on there is kj_yotemom -- and I've been being pretty good at uploading pics on there daily. I decided to join in on a challenge right now called Dollhouse therapy. A number of ladies are participating and working on one or two rooms of their dollhouses a month. Final reveal is end of June I believe. I joined to make sure I keep up with working on this little monster! lol

First picture is of what I'm thinking will be the floor for my living room/parlor area. This was done using a Mariner Dome kit from Brodnax, and salvaged wood from a floor I took out of a rehab dollhouse. Rather amazed it came out as well as it did! The edges have been trimmed up since taking that picture, and I applied a coat of Minwax Paste Finishing Wax so the floor has a lovely soft sheen now. Next picture is what I've been working on the last few days -- making my own mini subway tiles from polymer clay. This may actually be more repetitive than mini-shingling, and I didn't know that was possible... things you learn along the way! But I do want to say I'm glad I'm taking the time to make these as it's one way to really make this brownstone unique. 

Third picture is of a fireplace I got from an estate on Ebay. It's by Unique Miniatures, and once I'm done with it I'm hoping it will look like white marble... we will see. Lots of details to paint around, and I've not attempted to "marble" in miniature before. Seems like this house is a lot of firsts for me -- probably why it's been as frustrating and rewarding as it has been. Anyways, I've also managed to paint the brick sheets that will be cladding the brownstone, at least the base color. Still have to go back to paint some bricks to be more varied -- but I'm loving the way it's looking so far. This will have the plastic sheets of bricks on the sides and backs, and then Paperclay bricks on the front. I originally ordered the sheets of bricks b/c the house originally had that plastic coating on the front... have to love the irony!

Anyways, going to jump off here and see to the real life house at the moment. Hope everyone had a great weekend!

Tuesday, March 15, 2016

Working backwards, sideways, any way but what I normally would!

The title of the post says it all! I'm literally working on steps that I at this point normally wouldn't ever dream of working on. I still don't technically have four walls together. This is because I'm trying to figure out how I'm going to electrify this little gem. I had both side walls glued previously, with each floor fitted into their slots -- only to go down the next day and realize there was a definite tilt... As I prefer the idea of a stylish, classy brownstone the look of ready to fall over just wasn't going to work. (This was my session with this that I was contemplating the other week just taking it out and starting a nice bonfire in the driveway.) Luckily after scouring the internet, I found out a way to get my dollhouse shell apart with a lot less effort than I had already been putting into it and getting no where. Apparently it's a technique used by antique furniture restorers to loosen wood glue. White vinegar drizzled along the glue line, let it set for 10-15 minutes, then use a heat gun to loosen it the rest of the way. One still needs to be careful when pulling the sections apart, but if you're patient and let the vinegar do it's thing it will I promise you come apart without much issue!
So anyways, I now have the bottom and top glued into their respective slots on one side panel of the house. Before I glue on the other again, I want to use my Dremel to sand 1/4" slots for my tapewire to fit before I slide the other side on. I'm hoping to do that tomorrow after I do my cardio routine. (Boyfriend wants to lose weight and he's inspired me to join him. Though my goal isn't weight loss so much as build lean muscle mass.)
In reference to the title -- I'm trying my hands at different parquet patterns for a few of the different rooms in this house, as well as different patterns of stained glass. I've done actual stained glass in real life, but in miniature it's an entirely different business!

Piece of plexi after cutting.
Stained glass first. For my attempts I'm using 1/8 inch thick plexiglass. I cut this into the sizes I'd need with my Dremel cutting blade, and a sharp razor blade. Basically I just used the Dremel to get a little ways down along the lines I'd drawn, then did the same on the reverse. I didn't want to go all the way through. I find if you let the Dremel work for you and don't force it you shouldn't have any issues like melting or whatnot. Once I was comfortable with the depth of cut I'd gotten from the Dremel on both sides I then used a sharp razor blade to score it a couple more times and I was then able to snap it pretty easily. My edges aren't perfect, but I intend to insert these windows into channel molding once done, which will cover any irregularities.

This picture shows the first that I'm working on, the solder lines are done with lead golf tape -- I got mine from Amazon and thankfully pretty cheap. I cut my main straight lines at 1/8" thick, then got
gutsier and cut my "detail" lines at 1/16" thick. This definitely has a steep learning curve and it's not going to seem perfect when you're overlapping lead -- but remember real stained glass soldering isn't perfect either. I figure it's lending to the realism! Side note, I have found most of my patterns on Pinterest or free sites for stained glass. As I don't have a printer with me currently, it's been a lot of staring at pictures and sketching... Once I get done with the front side I'm going to repeat the process on the back --  matching my lead lines as best as I possibly can. A definite note to remember with this -- no matter what, make sure you wash your hands before you go for food or drink. I would say as soon as you're done working with the lead the better, just to be on the safe side.

Now in regards to the parquet... I have a couple of compass styled kits from Brodnax. I'm hoping to get one made up for this house. However, I don't want everything to be classic -- I want a little edge
This is going to take a while...
in here as well. A classy brownstone with attitude -- sounds good to me! Insert my inspirations from M. C. Escher. I'm attempting a 3-D look cube floor made with 3 different types of wood veneer. This has been going pretty smoothly in the cutting, now it's just trying to piece it all together -- guarantee that's going to be a few more days!


That's all that I've been up to for the last few, and in all likelihood what I'll be continuing to do for the next several. Trying to be good though and keep you all updated on my progress and keep my pics coming. If there's something specific I've not added pictures of, and you want to see just let me know in the comments and I'll see if I can't make it happen!  Hope you all have a good one!

Monday, March 7, 2016

Georgetown Dollhouse Kit... elusive and dangerous!

Alright, now that I'm feeling back on track and fairly settled into the new house -- I've been wanting to focus on my miniature making and dollhouserie! I brought one 1:12 house with me to work on which I've had for a couple of years but kept being put off by the front of it. The facade is MDF, which had several thick glue slicks on the back, and then the front was done in a plastic coating -- which with time has been cracking and flaking off in several spots. Initially I had no clue how to combat the issues with the plastic... however I decided this was one kit I could pack up fairly easily in a plastic tote and bring with me to my new home to work on when I could. As I had moved to enter into a new job and see how I and my boyfriend would do with living together -- I knew I would need some sort of project to keep me sane at times. lol  I realize that sounds terrible, but I've never lived with someone before and have always prized my alone time. Thankfully, he not only understands that but appreciates it as well!

Sooo, where am I with this rarely seen house? Thankfully not out in the driveway having a bonfire with the pieces like I wanted to a couple of weeks ago!  I've never had any one house give me so many issues at literally every step of the way... Tonight though I want to share the only article I've ever found in regards to this kit, and then also how I'm planning on making the uh-oh's and OH NO's work for both me and the kit!  :)

The article/description and picture are from the Miniatures Catalog Third edition, located on page 65 in the townhouse section. I've honestly only ever seen the one I have in person, and I've looked for this model elsewhere -- Ebay, Craigslist, Etsy, you name it. I've never seen another anywhere. So I have to wonder if perhaps the plastic coating made it more unpopular or what the reasoning may be. Either way, as mentioned my issue was that age had taken it's toll and a good bit of the plastic on my front opening panel was to be frank cracked, flaking, or had holes -- not a good start for an elegant brownstone! I then had the brilliant idea of using some of the Krylon Stone Finish paint to give texture to the bricks -- worked out well til a well-meaning man whom will remain nameless decided to be helpful and stand it upright while drying. Left my building with some nasty paint runs! So being brilliant and wanting to move forward(as in fix the mess) I used a paint stripper to remove the paint... That was my second big uh-on moment, as the paint stayed on in those nasty streaks, but the plastic came off almost everywhere else!

So, I did some research and found a product called Goof Off. It removes paint but is safe on plastic, that helped me to get rid of the streaks thankfully! However now I had a panel that still had the roof detail and shutters, but most everything else was obliterated... Oh, this kit also had no window panes -- so I'll be doing something from scratch to replace those. Anyways, while I had bought sheets of plastic brick to paint and put on the sides to match the front -- I now had a very sad looking, not a lot of brick detail left front. Thankfully, I've got two bags of miniature stone from Andi Mini Brick and stone which will work well to replace the side detailing of the front. In addition this has pushed me to try my hand with Paperclay -- I have two packs and am hoping to emulate/reproduce most of the original brick detail with it. Simply put, while I thought this project was going to be up in flames the other week for how upset I was getting with everything going wrong -- I've decided positive is always better, and there's always an answer even if not what we had initially planned on.  :)


Sunday, March 6, 2016

Been a long time gone...

Yikes! I have been away from this forever it seems. Thankfully, after moving I find myself with a new dedicated craft/mini room in the basement which my boyfriend delights in calling my dungeon. lol It's a happy dungeon though, and I've truly been enjoying my time in it.

I only brought one 1:12 scale project with me -- but as my brownstone has been delighting in stymieing me nearly every step of the way I've also been trying my hand at smaller scales. To date I have one of four "corner scenes" done. The first I finished the other day is in 1:144 scale and depicts Spring. Definitely have to say painting in this small a scale takes some getting used to! However, I truly found I enjoyed how quickly I was able to complete this project, and how nice it really looks.


In regards to my blogging, I am contemplating moving over to Bloglovin' just for the simple matter it is seemingly easier for me to move around and find similarly minded folks. For now that's all I can really update with, but hope everyone is doing wonderfully!

<div id="MTgwMzAyMjU="><a href="https://activate.bloglovin.com/profile/18030225"><img src="https://activate.bloglovin.com/common/images/badge1.png" width="200" height="200"/></a></div>


Sunday, June 30, 2013

Trusting fate... as well as luck!


 This year started out rough for me as so many knew in regards to the loss of my boy Cory. From there however I had my grieving time, and I'd lie if I said I didn't still tear up ever so often when a memory hits -- but I now also have the pleasure of being mom to one of the quirkiest animals I think that has ever lived. A wonderfully cute lass who when she stands can put her paws on my shoulders and jumps nearly as high as I am tall... You get to witness those jumps when she's chasing butterflies and birds, yet will hide from bunnies. Truly she's just such a pleasure to be around and fills my heart daily!
 Anyways, in regards to the title of this post -- I shared this in the GL forums already and thought it high time I update here. Sorry I've been so lax in my posts of late -- going to really try to remember to update here!  :/ oops
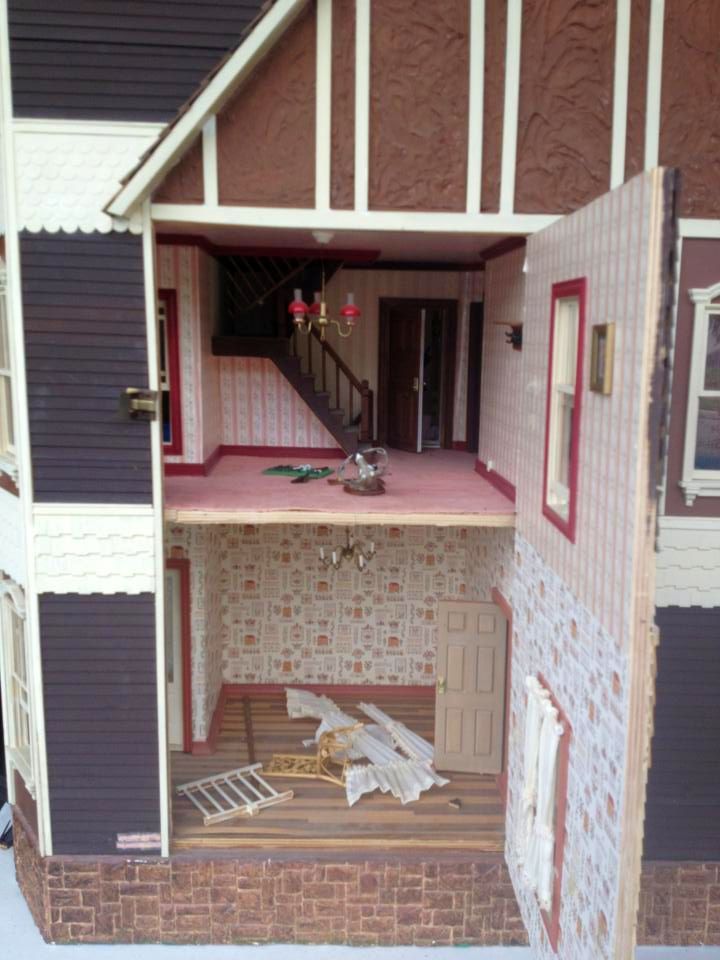
 About a month ago I saw a craigslist ad for a house, and I was so struck by it.. It was listed for an amount I knew I couldn't afford -- but I e-mailed the person whom had it listed. Basic e-mail consisted of: This is a beautiful house, and while I can't offer you the money you're asking, if you are unable to find someone to help you out with this before your move I would love to finish/rehab this b/c I think it will be beautiful once completely finished and I would love to bring it to it's full glory. Fast forward to this last Weds. when surprise I got a reply e-mail! She stated she had had another interested party -- but that person was unable to find transportation for the house. She then stated she would like to give the house to me!!!
 I knew I couldn't make it up there on such short notice. Luckily I've a friend that lives not even three miles away and was willing to pick it up and hold it for me. As of 11am this morning --she picked it up, and sent me pictures. Going to share those with you guys as I've shared on Greenleaf's forum. Cannot even begin to share how very excited I am!!! 

Hope you all enjoy the eye candy as well!  :)


Sunday, February 10, 2013

Progress... Slowly but Surely!

Don't have pictures as of yet, but I have been making some progress on the Walmer house.  :)
Just wanted to update here, and hopefully make sure I take some pictures and post later! Seems I never do that until a project is done, and I promised myself I would take pictures and track  this while redoing it. To update so far, I've had a bit of help using some scrap lumber to brace the bottom floor. I've added the brace length wise across the base, and then also added a couple of cross braces on each end. This was for a few different reasons. Number one, it's a big house and there was a small bit of warping to the base. After spritzing with a bit of water and weighting it, it seemed to straighten out fairly well -- but, this is a secondary measure to keep it so. Number two, this allowed me a place on the ends to add wheels so that I can move it easily! It's big, and when put all together a decent weight. lol Number three, I've never electrified a dollhouse I've worked on yet, though I've been thinking of doing so for a long while. This house, with the braces underneath has perfect hiding locations for electricity to be added! I've already figured that with the number of rooms, the amount of lights(more specifically the bulbs) will need to be split between several transformers... I've already got three, and knowing the visions that have been filtering through my head of chandeliers that I want to attempt to make and a good billiard light(again, hoping to make it) I KNOW I'm going to be using a lot.

I have also repainted the base on the outside, so far it's just been redone with a latex white paint to clean it up a bit. I've also used some Houseworks tile flooring in the kitchen, the white tiles with inset black diamonds. My mother when she sees that automatically jumps to the matter she loves the way it looks... For myself I keep wondering if I may need to pull out a toothpick again and use a shade of grey in between the tiles to not only give it a bit more depth, but also just make it more realistic looking to me. Still contemplating that.

For the dining room I've decided on a herringbone parquet floor. This room is set next to the kitchen and is I believe two inches deeper. If I'm recalling right it is 14 inches wide and 16 inches deep. Btw, if I didn't mention it -- this floor is not a kit. It is being cut from Band It veneer in two woods -- and I don't believe I've seen it done this way before... But, again I like the way it looks so what the hey! ;)/

Next room will be the foyer, or entrance room, if I didn't mention I'm describing these from left to right when standing at the back. This room in and of itself, is truly interesting as it has a two step entrance down into the room, and then has a staircase on the left hand side that turns into the room. I figure on doing a parquet pattern in this room as well, based on a French provincial design I've come across several times and loved. Hoping I've enough of the Greenleaf parquet floor tiles to do this, and will in all likelihood add in some of the Bandit veneer in the design as well.

Last but not least you get to what I'm thinking I'll either make into the main floor library or game room. Leaning towards this being the library though. The flooring in this will be marble. I had one sheet of Handley House Green Marble Flooring, along with a bunch of black plastic tiles I was thinking of using with it. As it was in laying it out, I really just figured it would all be waaaay too dark. So I then decided to try my hand at making marble out of mat board... Which led me to a different layout of my green marble and the realization that the depths would be totally off. So after several days, I found the perfect number(three) of sheets of cardstock to glue to the back of the marble paper to match up with the mat board marble. Haven't gotten all of the mat board glued in, and have realized my cutting of the green marble wasn't as well done as I would have liked -- but who knows, I may just make another sheet of marble out of mat board and use that instead of the marble paper. I haven't decided on that as yet, as I don't care to waste anything -- and this house is being done on the cheap. AKA I have a lot of different paper etc, that I would like to actually use as opposed to just buying thinking that I should go out and buy more.

This has already led to a theme for this house, a family home lived in through the ages. In some rooms I hope to have some of the modern amenities, and then also have touches of what may have been there before. Truly think this one will be not only one I intend to ensconce some memories(already have several corgi figures that will go in it throughout) but also just have a lot of fun with in trying out new things!

It is quarter after 5 in the morning and I still have yet to be able to sleep, Going to try to do so now, and hope that sleeping upright may help -- when it feels like you have spikes going through your joints like your hips and knees... Rather prevents comfortable sleep! lol Learn to adjust as you can, like my dollhouserie so far! If I can I will try to get pics up of the progress I've made so far later today.

Hope you all out in bloglandia are doing great!  :)

Sunday, January 13, 2013

Long Overdue...


First, let me just wish everyone a Happy New Year and a hopefully Merry holiday season, whatever it is you may celebrate. Mine was a little rough due to my own health issues and losing my boy Cory. I know his passing was a blessing, as he'd been fighting a battle that I can only be thankful I was by his side  so he wasn't alone. However, even knowing that that time is coming... I just don't think anyone is ever prepared to lose one they love -- whether they have fur or not. Suppose my one point I can truly be glad of, is that he died while wrapped in my arms being told how much he was loved. He was a truly special boy, and I will love and remember him always. <3

In a way, his passing inspired me to get to work on a project or two I've been letting sit due to not enough space while taking care of him and myself. But I thought now more than ever I needed something to keep me from dwelling on all that went ways other than I wished this last year. So I pulled out my Walmer French Colonial, and cleaned up my work space. I hope in this house... to put together something truly remarkable, try new and different things, while respecting older, experienced, and valued methods. All of which Cory helped me do in my life. I hope in this project to truly do honor to my memories of him. Not necessarily to honor him, because to be quite honest it's generally been the cats that have been most interested in the dollhouses. None the less, it will be special to me in regards to him.

So, a quick recap of what this dollhouse is. It stopped being produced in the 1970's, which makes it older than me by a bit. It has 12 rooms spread out over four floors, all of which average at least 13-14 inches square. This was termed as a "drop down" dollhouse, meaning it was slotted together and then held with wooden pegs. Quite amazing as when this is all together it measures over 4 feet in height, and I believe as much in length! The following is a pretty crappy picture of it, but this was taken a year ago plus when I first got it, and was making sure it would all go together. It was evidently painted this dark navy blue for the house body, light gray roofs, and white detailing in the factory. I can tell you all right now it will not stay these colors, nor when I am done with it will it have the same features. If you look at the picture you can see the chunky window details, while these were a general character trait of most Walmer houses I just don't like them in this case. I also hope to come up with something different for the front door. Bright side though, other than a lot of stain on the floor, and some excess use of glue on the stairs -- nothing at all was done with the interior. That's all for now, but wanted to catch everyone up as to where I've been, and where I hope to go for now. More updates next time, til then...  


Tuesday, October 9, 2012

Pictures of the Bungalow... Finally!

You read it right, I am finally as finished with this little house as ever I will be. Had reached the point I knew if I kept at it -- I'd just end up doing too much with it. As it stands I think this is a delightful house, and honestly lovely to put together! Again, it was The Cassie dollhouse by The House That Jack Built. Got it for a great price when it was on sale, and I only hope that whomever it may go to this holiday season may love it so much as I loved putting it together.  =)


 A quick shot that to me says "Come on in!"  Not sure the why of it, but I've always enjoyed pictures into dollhouses like this -- very much inviting you in to let your imaginations run wild. 
 A brief view of the front exterior of the house, truly did enjoy the color scheme on this one. Just really put me in mind of a beach side cottage -- weathering slowly but surely, even while the owners do their best to keep up with it. No matter what looking at this picture of it makes me smile...

Next, an overall view of the back of the house. Again, please remember if you click on the pictures they'll get bigger to show more detail. Besides the matter that all of the shingles were homemade(thus some of the variance in them, which I loved), but this house also boasts my first attempt at a built-in. Under the window in the bathroom I wanted to make the wall look more appropriate for a bathroom, thus the built-in idea was born. lol


Last but not least I wanted to show a picture of the lower floor. I do believe the kitchen is the most modern looking I've gone in decorating so far. Though the living room also was lovely in the making, completely different than I'd done before -- let alone considered doing, but I love the way it turned out. The last couple of pictures at the bottom are to show these in a bit better detail.


 The kitchen was completely finished with scrapbook papers -- and I must say, I had A LOT of fun with this! Truly wish I could get a better picture of the ceiling, it's an embossed paper with the look of numerous roses popping out. Puts me in mind of an extreme version of pressed tin!
 Last but not least is a picture of the living room, specifically the stairs! First time I've ever considered painting with a toothpick, but again I liked how they turned out... You can't tell in this picture I don't think, but in each of the stripes on the flooring paper there are extremely tiny fleur de lis that match the wainscoting. :)

From each of my house building experiences I'd like to think I walk away with a new bit of knowledge or understanding of self, and why it is I so enjoy these little gems. In this case -- two points came to me: no matter if you've not tried it, and you're not too sure if it'll work -- try it out, it may well surprise you how much that oddball idea will work. Second, even if you've never attempted something before -- it's just like real life, if you don't have the guts to try it, you'll just end up wondering how it may've been down the road. For myself I'm extremely glad I did try the different decorating techniques, as well as making so many bits and pieces for this myself -- shingles, window trim, built-ins, and stair decorating all get to be filed under "So glad I did it!"


Saturday, September 29, 2012

One of those days...

Okay, one of those weeks, months, well you get the picture... lol I finally got all the shingles on the bungalow done. At least in being glued down. I think I mentioned that these are all homemade shingles, which shows a slightly larger grain on some, but it lends to the more rustic look of the outside. I can so easily imagine this little house in a beach side community somewhere. Aging, not necassarily so gracefully as the homeowners would wish -- but they keep doing fresh paint while other aspects of it show weathering as homes along the coast would.

I may be in trouble, as my not so local WalMart has now started carrying a much improved craft section -- now including Sculpey. Think I mentioned this previously, but they're now carrying the variety pack of colors as well. Believe it or not, the pricing is not bad either. I keep looking at my newly bought clay and wondering if I dare try to finally sculpt a little person to take pictures in some of the houses with...

Also, managed to come across some bags of scrap material -- some very decent for mini usage! $2.00 a  bag, I couldn't resist. One bag is all sorts of plain colors, the other however is full of fun holiday designed fabric for both the Christmas season as well as St. Patrick's day(with my notably red-hued hair, and freckles -- this is one of my faves!) Thinking I may well try to do a mini quilt soon as well. Though I have been having fun going through A LOT of books I got from the library in regards to making mini furniture. Think I'm very much one of those people I like to really research to get a good mental grasp of a concept before I'm willing to risk using the materials and screwing up so badly... Given a bit of screw up is good for learning, but I'd prefer as little as possible. lol

Anyways, in regards to the title of this entry -- I keep looking around and realizing just how many projects I have sitting about. While I hope to update with the next blog entry of the bungalow being done. I'm also starting on a Duracraft Farmhouse, of which a lot of pieces were missing from the kit I got. So have been out in the shop today marking on plywood a good number of the pieces I know I can make from scratch using the dimensions from the instructions list of parts. I thankfully have most of the siding other than 6 pieces of the longest needed -- may end up making those as well, but hoping I may find some somewhere on-line if I get lucky. Keep your fingers crossed for me!

In other mini-related news, one of our local stores is changing from one store name to another -- and thankfully one of the store managers thought of me and my mini-endeavors. Their blind samples from I believe it's called Bally Blinds are being given to me once all their main blinds sell -- will also try to get pics of these as I get them. Some of this material is just fun!!!  =)

That's all I have to update on for now, but didn't want anyone to think I'd been sitting here idle. Meanwhile, hope everyone's mini work is going great -- going to go browse some other blogs to see what everyone else has been up to while I wait for dinner to get done. Have a good one!

Sunday, September 16, 2012

Not a whole lot to update...

Must admit to being a bit lazy today, kind of feels like trying to keep my eyes open after taking the newer anti-inflammatory is impossible. None the less, I have been working on shingling the bungalow -- never my most favorite section of a house. Don't get me wrong if you're in the mood to let your mind wander and still work, shingles are great. Just wasn't there for me today. Don't know if I had mentioned but the shingles on this house are all scratch made here at home. Really not hard to do at all, and I like the look of these -- a bit more rustic right off the bat. We'll see how the finished product turns out, but at the moment when I look at this little house I think it's my best one yet... It somehow puts me in the mood of a little bungalow on a cape somewhere. Makes me smile.

In other news I should get my shipment from HBS from their House of Miniatures sale tomorrow. I also have some molding in that order which I need to finish the living room of the bungalow. Have to admit I'm quite excited over that! Had also found an old American Girls Minis Illuma Room for $3.99 at the local Goodwill store. Haven't tried the power in it yet, but have my doubts it works -- simple reason being it looks like someone tried to take the box apart at the base. Probably just blew the transformer with it previously -- and in all honesty, not too big a deal. Think I'm going to do this into a sports themed football roombox for one of the few true guy friends I have. He's just recently bought his first house, and will also be having a birthday in a little bit... So, even though I'm definitely not a Steelers fan -- going to see what I can do since he happens to be a die hard fan. lol

Meanwhile, going to go attempt to do something so that I don't feel like this was such a wasted day for mini-making. Hope everyone's had a good one!

Friday, September 14, 2012

A visit back...

At least for me that is! When my niece Alyssa was still living nearby, was a fun past time to go out for walks and search for bits and pieces that could be used for her dollhouse from nature. I always enjoyed those little ventures, as I can only hope she did as well.

As I've still been shingling the Bungalow for donation I wanted something else to work on to feel like I was accomplishing a bit more... They're not instant gratification, but watching the grain come out after so much time spent sanding and poly-ing -- like no other!!!


 So, here are a few quick pictures to show what can be wrought from a walk through the woods with a beautiful child whom has always found wonder in the everyday course of life!  =)


Thursday, August 30, 2012

I'm a bad bad blogger...


I admit this freely now -- I could give you the excuses of feeling like death this last week with limited mobility... but life is what it is, I'm just having to learn to lead it a bit differently than before! So, at the very least I feel I should update with what I have been up to as of recent days.

Number One: The Cassie dh kit by The House That Jack Built -- lovely kit and I will soon be done with it. This is a cute little bungalow of a house, and it will be joining the Hickory Ridge Log Cabin, and The Heather dollhouse kits that I made for Relay for Life this year.

Number Two: I've been working diligently on the house... but find I have the same repetitive tasks of cleaning cat fur out of it night by night. It seems my supervisor has quite decided that while the house is here -- it is whether I realize it or not, PERFECT for him! lol Ah well, he's been fun to work with.  ;)

Number Three: I've been trying to get up the gumption for the last year to really give a go at combining my mini making with stained glass, another hobby I was talked into long ago when my mom wanted to take classes at the local college. Think I was a sophomore or junior in high school when we took those classes. Anyways, I've really been wanting to get back into the stained glass as well, and kept considering how to combine the two. I guess it just seems silly to me to see so many dh companies selling "greenhouses" that are made of plexiglass or very thin acetate like material. I've finally figured out where to get glass that is thinner and more in line with the dimensions I'm thinking of -- so tomorrow, I'm taking my first pattern out to the shop and seeing if I can't actually make something worthwhile besides indulging myself and having fun.

Number Four: Last but not least -- guess who has been asked or "commissioned" if you want to sound snobbish about it to build a dollhouse for someone else?!? That's right, little old me. A girl I went to high school with has seen several of my dollhouses that I've finished up and has asked me to make a farmhouse for her daughter for Christmas. I personally love the matter she's told me it will mean that much more that I make it -- and that she and her husband hope to keep it even after she's done with it for grandchildren!  :) She had initially requested this last year, but with her husband still over seas serving... Well, this is a gift they both wanted to be there for -- so this year it's definitely happening! So glad that they are both back together and safe!

Gives you(or at least it does me) a nice feeling to help build tomorrow's memories from today's dreams. Hope everyone else has been doing wonderfully! Oh, and last good point to share -- guess who's now managing to make all of her own shingles? That will be a for sure money saver for me! lol